Help articles
CATEGORY: Settings
Enabling passkeys: User guide
Passkeys and e-shot
e-shot introduced passkeys for 2 main reasons
Our commitment to enhance security and protection of users and their data
Easy and simple way to sign in securely
Better Security (Phishing-Resistant)
Eliminates password-related breaches – No weak, reused, or stolen passwords.
Prevents phishing – No credentials to steal via fake login pages.
Resistant to credential stuffing – Passkeys are unique for each site and can't be reused.
Frictionless User Experience (No More Passwords!) 🚀
Faster logins – Users authenticate with Face ID, Touch ID, or device PIN.
No password resets – Eliminates forgotten passwords and support tickets.
Cross-device authentication – Users can log in on a new device by scanning a QR code.
Compliance & Industry Standards
Meets strong authentication requirements (NIST, GDPR, PSD2, etc.).
Backed by Apple, Google, and Microsoft, ensuring long-term adoption.
Improves SOC 2 compliance by reducing password risks.
e-shot will NEVER know what passkey method you choose or have access to any private keys
What are passkeys?
A Passkey is a passwordless authentication method that replaces traditional passwords with cryptographic key pairs. It is designed to be more secure, phishing-resistant, and easier to use compared to passwords and traditional two-factor authentication (2FA).
More information can be found here.
Can you use passkeys?
Passkeys rely on several key dependencies to function properly. These dependencies ensure security, interoperability, and a seamless user experience.
They require support from operating systems (Windows, macOS, iOS, Android) and browsers (Chrome, Edge, Safari, Firefox).
Major tech companies (Apple, Google, Microsoft) have integrated passkey support into their ecosystems.
They also require a local authentication method, such as:
Biometrics (Face ID, Touch ID, Windows Hello)
Device PIN (if biometrics are unavailable)
This ensures that even if someone has the device, they cannot use the passkey without authorisation.
What do you need to use passkeys?
Passkeys are primarily device-based, meaning the private key is stored securely on a specific device. However, there are ways to sync or transfer them across devices, depending on the ecosystem.
Private Key Storage: The private key is generated and stored in a secure hardware module (e.g., Secure Enclave on Apple devices, TPM on Windows/Android).
Non-Exportable: The private key never leaves the device, making phishing and remote attacks nearly impossible.
Authentication Tied to Device: Users authenticate via biometrics (Face ID, Touch ID, Windows Hello) or a PIN on that device.
How do I know what my device can use?
Windows (PC & Laptops)
Windows 10/11 with TPM 2.0 (most modern PCs have this).
Uses Windows Hello (Face, Fingerprint, or PIN) for authentication.
Go to Settings → Accounts → Sign-in options
Look for Windows Hello (Face, Fingerprint, or PIN)
Mac (MacBook, iMac, Mac Mini)
macOS Ventura (13.0) or later supports passkeys.
Uses Touch ID (on MacBooks) or a connected iPhone for authentication.
To check:
Open System Settings → Touch ID & Password
Ensure Touch ID is enabled.
iPhone & iPad
iOS/iPadOS 16 or later supports passkeys.
Uses Face ID or Touch ID for authentication.
To check:
Open Settings → Passwords
Look for "Passkeys" under saved passwords.
Android Phones & Tablets
Android 9 (Pie) or later supports passkeys.
Uses Google Password Manager or Samsung Pass for storage.
To check:
Open Settings → Google → Passwords & Autofill
Look for Passkeys under Google Password Manager
How to setup passkeys on your e-shot account
Passkeys can only be setup by the user themselves. Unlike MFA and SSO it cannot be enforced by admin users.
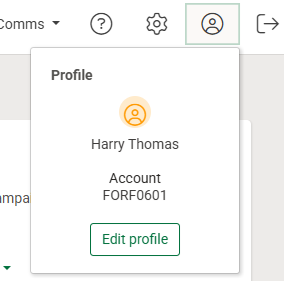
As a logged in user, firstly head to your e-shot user profile by clicking the profile icon in the top right of any e-shot page, then click the ‘Edit profile’ button.
Upon doing so, you will be taken to the below page.

To begin setting up a passkey, click the ‘Manage passkeys’ button in the top right of the page where you will taken to another page seen below.

On this page you can manage existing passkeys or setup new ones. As this is my first time setting up a passkey, this page displays no items.
To set up a new passkey, click the ‘Add a passkey’ button in the top right corner.
Please note depending on your device and browser being used as well as if you have used a passkey before, the next steps can vary. Our example is using Google Chrome where a passkey PIN has never been set before.
On your page you will get a system popup, see example below.
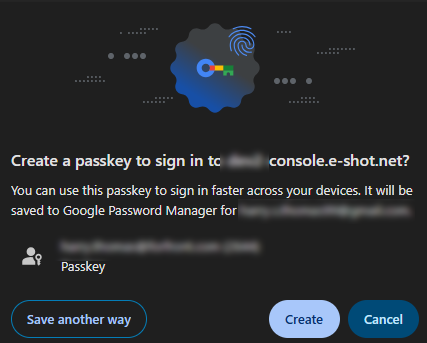
Here your system device is asking to authenticate a passkey with e-shot in order to login using a passkey. If you wish to continue, click ‘Create’.
Again, depending on the device and browser, steps may vary but you will be asked in some capacity to setup your passwordless key.
As seen below for Google Chrome, you can set a 6-character key either made up of just numbers or numbers and letters. If you are using Google Chrome and have already set a PIN before, it won't ask you to set this as you will use the same PIN.
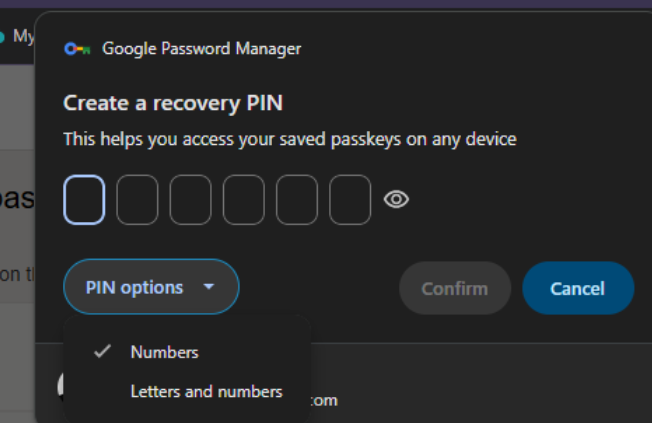
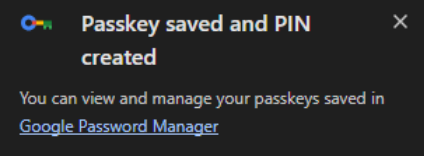
Once you have entered your PIN, click confirm. Your browser/device will give you a form of confirmation.
Google has a password manager where your PIN will also be stored, this will be the same for most browser types.
You can click the ‘Google Password Manager’ link to see all the passkeys you have set up.
Head back to e-shot, you will be asked to name your passkey as seen below.
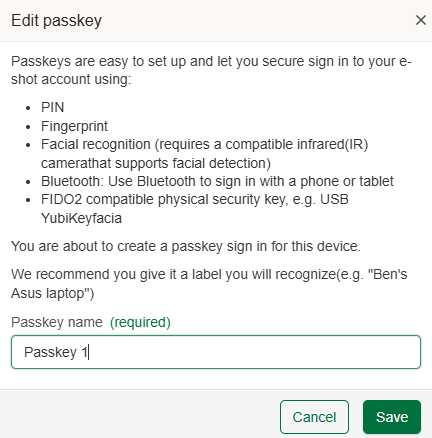
Once you have given it a name, click ‘Save’.
Your passkey will now be found on the list page where you can edit or delete it at any time.
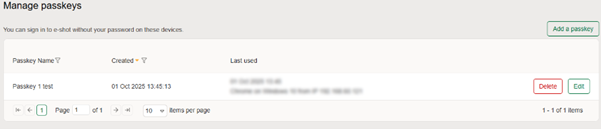
Note: The ‘Last used’ column will remain blank until you login for the first time using the passkey.
Your passkey can now be used to login to e-shot.
Logging in using your passkey
From the e-shot login page, enter the email address linked to your e-shot account as normal.
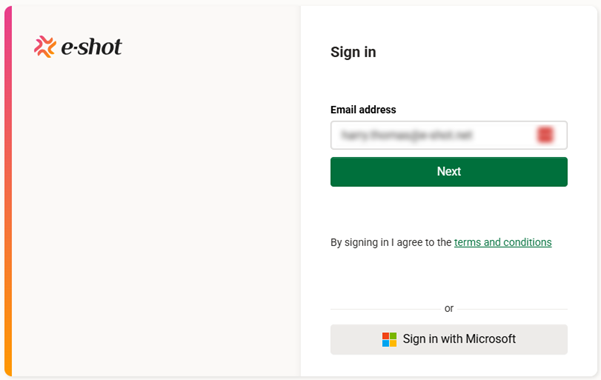
Once entered, click the ‘Next’ button.
You will be taken to the page where you can either sign in using your password as normal or you will find the ‘Sign in using passkeys’ button at the bottom.
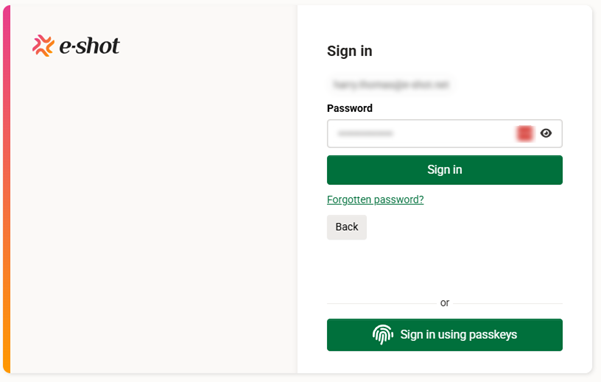
*Please note the button will only show for the browser you have set your passkey up in. For example, as mine has been setup in Google Chrome, if I went to login using Edge, the ‘Sign in using passkey’ button would not show
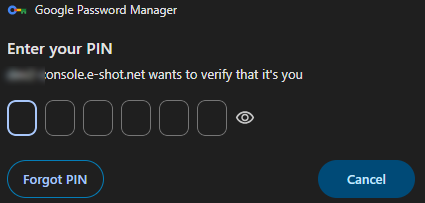
Upon click this button, depending on the browser/device you will get a popup. See Google Chrome example below.

It has pre saved to my saved passkey for console.e-shot.net and so for my example I can just click ‘Continue’. In other browsers/devices, you may need to choose your passkey if it's not pre-filled.
Upon clicking ‘Continue’, I’m asked to enter my PIN that I set up before for to use as my passkey.
Upon entering the correct PIN, your browser should automatically begin to log you into e-shot, where depending on how many subaccounts you have access to you will either:
Be asked to select which subaccount you wish to login into.
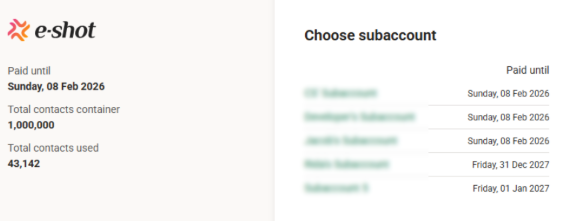
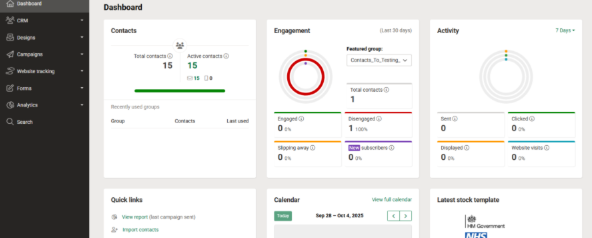
Or if you only have access to one subaccount, you’ll be taken to the e-shot dashboard page.
You may also like these articles
Data Protection
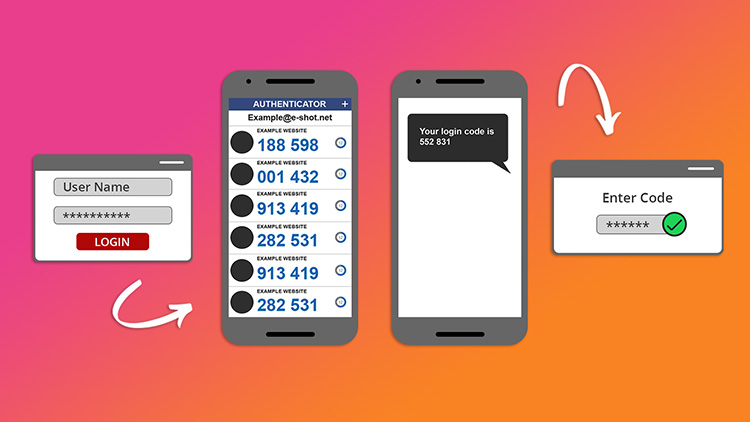
Multi-factor Authentication (MFA): What is it and why you need it
March 1st, 2022 - Sadie Burgess
Traditional usernames and passwords can be easily compromised. Multi-factor authentication (MFA), is a security control that requires users to...
FAQs Settings
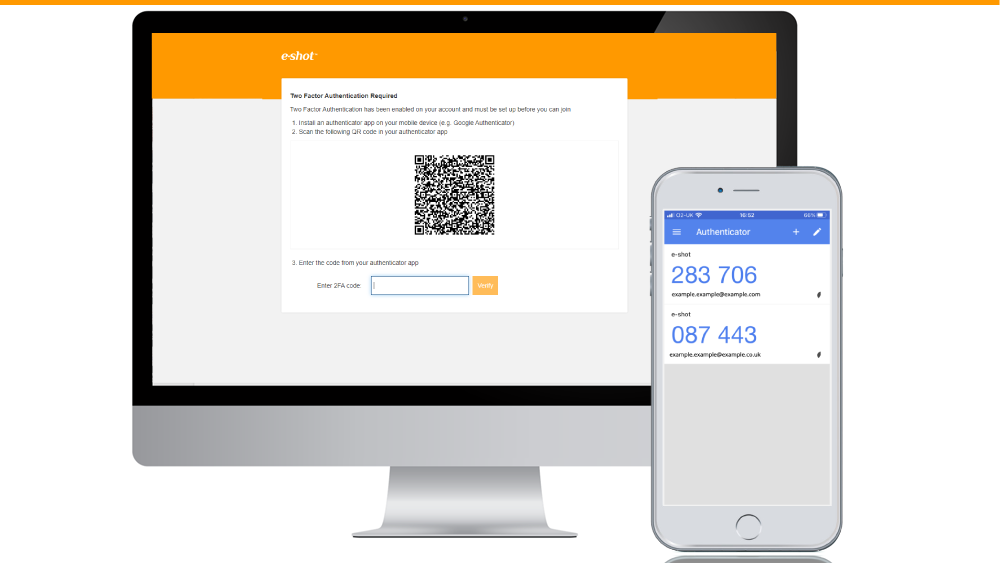
Enabling MFA: User Guide
November 12th, 2020 - Sadie Burgess
To protect your security, you should restrict access to your account by using Multi-Factor Authentication (MFA). You will sign in using your...
Settings
Enabling SSO with Microsoft 365: Administrator Guide
June 7th, 2023 - Harry Thomas
This guide is intended for your IT support team to enable authorised e-shot users to sign in to e-shot by using their Microsoft 365 credentials....
Solutions
Email Marketing
Create email campaigns and newsletters and manage end-to-end subscription processes with forms and preferences.
Marketing Automation
Create sophisticated automated campaigns for email and SMS combined.
Digital Communication
The comprehensive solution to manage and automate your digital communication across email, SMS, websites and landing pages.
Email marketing healthcheck
We are confident that we can help you, which is why we offer a free healthcheck to identify potential issues with your current programme and free advice on things that could be done to improve it.