Help articles
CATEGORY: Forms and Landing Pages
Forms: Preference Centre
-1657540460.jpg)
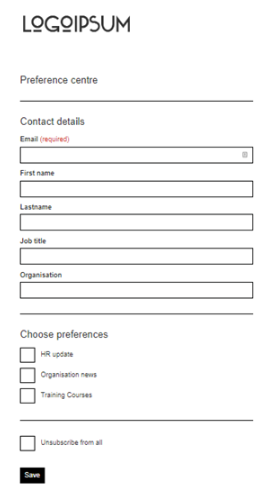
There are 3 areas in e-shot that make up a ‘Preference Centre’.
Settings > Preference settings - where you define the individual preferences for contacts to subscribe to.
Forms > Preference centre - choose the fields or information to appear on your Preference form. Subscribers will be able to amend this information, including changing their email address.
CRM > Preferences - where you can review who and how many contacts are subscribed to each of your Preferences.
Setting up your required Preferences
Login to e-shot, and at the top right of the page navigate to Settings > Preference settings.
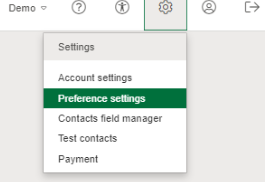
Add the preferences that you would like contacts to be able to subscribe to. These would be the topics or categories that your contacts can subscribe to.
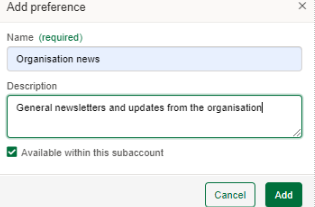
In our example, we're going to create the Preferences "Organisation news", "HR update", and "Training courses". Feel free to add in a description for extra context if you want to.
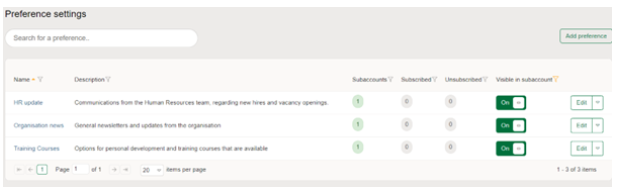
Go ahead and create your Preferences (topics), once created they should show in your list under Preference settings.
By default, they will show up as “Visible in subaccount”, although you can deactivate them (make them invisible in the subaccount) if you’d like to temporarily disable them or use at a later date. As we want to use them straight away in this example, we’ll leave them as Visible.
Creating your Preference Centre
Navigate to Forms > Preference centre via the main menu on the left of the page.
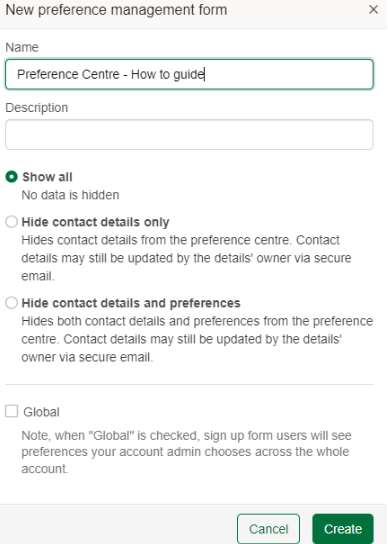
Click “New preference centre” on the right side of that page.

In the window that pops up, enter a name (and a description if desired) for your preference centre. Here there will also be an option to hide certain features on your preference centre unless accessed via a secure email. This prevents anyone from seeing someone’s sensitive or personally identifiable data and chosen preferences.
You can then click “create” to finish setting up your preference centre.
Your preference centre now exists, but we still need to configure how we want it to operate.
Once clicking create, you will automatically be taken to the page to finish setting up your preference centre, this doesn’t have to be done straight away and you can click back if you wish to do this later.
You will see these four options at the top of the page, each one will need to be looked at before publishing the preference centre.

Stage 1: Preference centre form
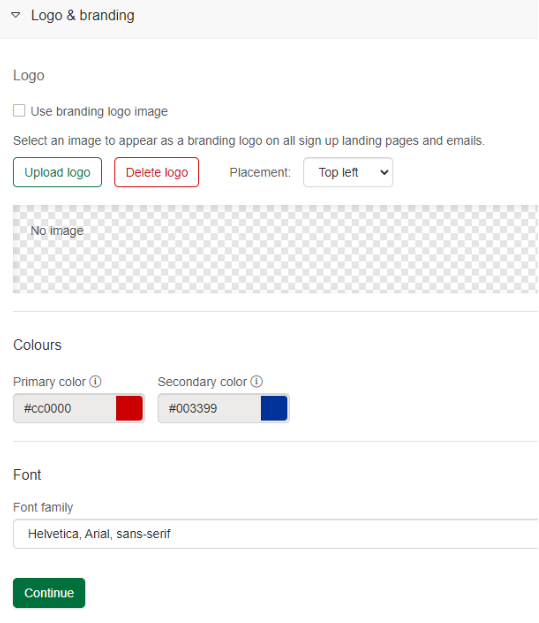
First section: Logo and Branding
In this section you are able to setup some basic branding such as what colours you want on the form and the font to be used. You can also either upload a logo or if you have setup your branding in Designs > Branding you can just tick the box to use the logo you have previously setup.
Second section: Data fields
By ticking the checkboxes to the left of the field you can choose what input fields (contact specific information) to appear on your form to capture from the contact when they initially subscribe or go to update their subscription preferences.
Note: Email will always be chosen by default as it is a required field. The rest are entirely customisable.

Once you tick the checkboxes for the desired input fields, these field(s) will show up on the right side of the page. You can also re-arrange the order of the input fields as you see fit, by clicking and dragging them up or down in the list on the right.
Third section: Header and body text
Here you can set the header and some body text for your preference centre. The header is set for you, but this is customisable.

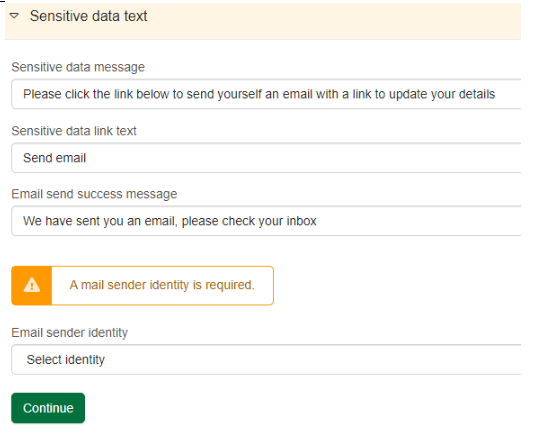
Fourth section: Sensitive data text
This option will only show for you if when first creating your preference centre you selected either ‘Hide contact details only’ or ‘Hide contact details and preferences’.
If you did select either of these options, you are able to customise this process and choose the sender identity for when you sent the email to your subscribers. These details are all defaulted for you but again it is customisable.
Fifth, sixth and seventh section: Contact details header text, Preferences and Groups
These stages are very simple and are all part of setting what headings you would like on your preference centre.
These stages allow you to set a header for the contact details options and the groups and preferences that will be displayed on your preference centre.
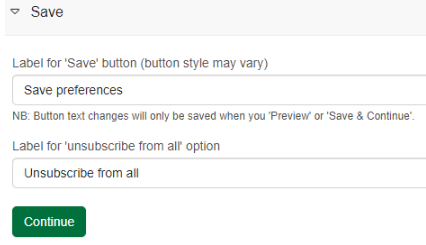
Eighth section: Save
At this section you can edit the button that someone clicks to save their preferences or the tick box that enables them to unsubscribe. These have been set for you but can be altered.
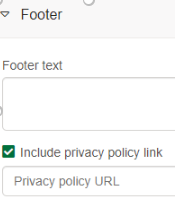
Ninth section: Footer
This section allows you to put some text in the footer of the preference centre if needed, for example you may want your company information to be displayed here.
There is also a tick box to include a privacy policy link on the form. When turned on you can past a URL into here.
Once you have edited all these sections as necessary, click Save & Continue to move onto the Update preference centre message section of your preference centre.
Stage 2: Update preference centre message
Here you can choose whether to use the standard message to display when a user updates their preferences or enter a custom URL to a page of your own choice.
Unless you have a specific requirement for this, it’s best to choose “Show a message” so that standard message is displayed.
You can amend the content of the message as desired by editing the text in the “Page title text” and “Page body content” fields.
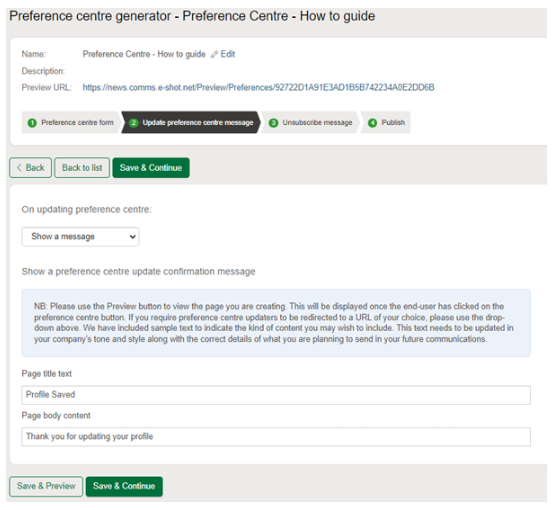
Once you have finished here, click Save & Continue to move on to the Unsubscribe message section.
Stage 3: Unsubscribe message
At this stage, you can choose whether to use the standard message to display when a user unsubscribes from their preferences or enter a custom URL to a page of your own choice.
Unless you have a specific requirement for this, it’s best to choose “Show a message” so that standard message is displayed.
Similarly, to the previous section, you can amend the Unsubscribe message as desired by editing the text in the “Page title text” and “Page body content” fields.
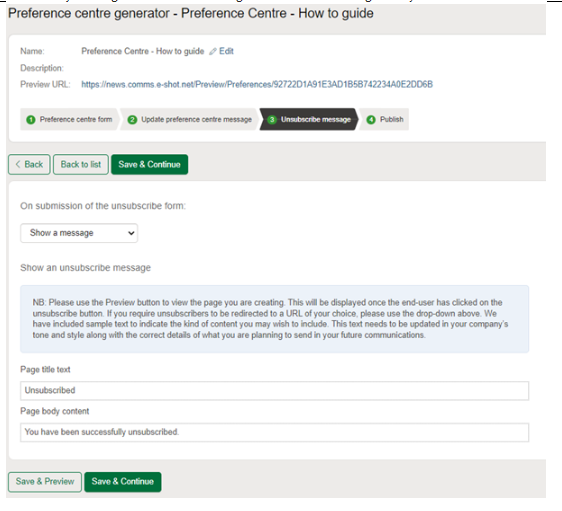
Once you have finished here, click Save & Continue to move on to the Publish section.
Stage 4: Publish
This is the final section of creating your preference centre. This section doesn’t need any changes unless you have specific requirements.
It is more to review what you have created. You will see the preview URL at the top, if you click this you can view what your preference centre looks like. There are also options to preview what your manage profile, update profile and subscribe messages look like.
If you are an advanced user there is the code for your preference centre which allows you to override text labels and validation rules. We advise against this unless it is truly needed.
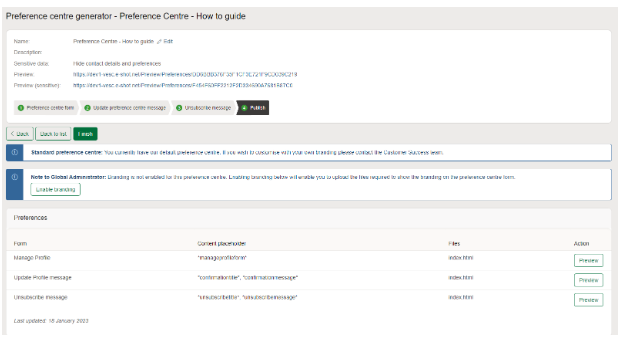
Once you are happy, click the Finish button and you will be taken back to the Preference centre page.
If you used the same fields and preferences as our example, your Preference form should like similar to the below:
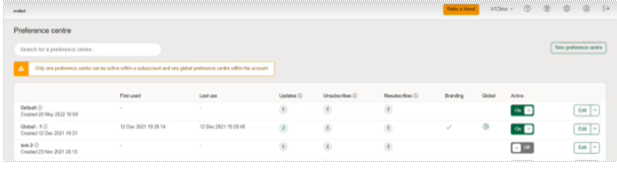
Setting your preference centre to active
Once you’ve clicked Finish, you will be taken back to the main preference centre page and set your preference centre to “Active”.

Now your contacts will be able to see this Preference Centre form if they click on the “Unsubscribe” or “Update your subscription preferences” links at the bottom of your email Designs.
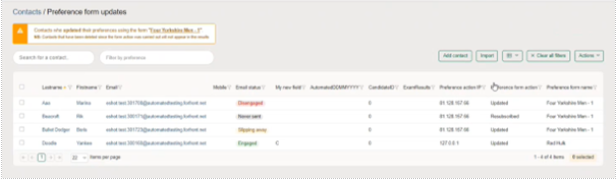
What are your subscriber preferences?
Users can now drilldown and see which contacts interacted with a preference form and how. This can be done from the Preference centre under the Forms tab in the Dashboard. Users can now click into the fields Updates, Re-subscribes and Unsubscribes to view what contacts have interacted in what way. This can be viewed by clicking on the values under each heading.
Drilled down data will be presented as so. With the details regarding the contact as well as what their Preference form action was.
You may also like these articles
.png)
Forms and Landing Pages
Forms: Landing Pages
January 20th, 2022 - Sadie Burgess
A landing page effectively enables you to put a vanity URL wrapper around your sign-up form, and indeed allow you to do some other things as well....
Forms and Landing Pages
Forms: Sign-up forms
January 19th, 2022 - Sadie Burgess
To grow your subscriber base, you need somewhere that new subscribers can sign up. To manage your forms, go to the forms section in the main menu...
.png)
Designs
Designs: Branding
January 20th, 2022 - Sadie Burgess
In the Branding section of the console you are able to control elements, such as your default logo, centrally. This is the place you would put your...
Solutions
Email Marketing
Create email campaigns and newsletters and manage end-to-end subscription processes with forms and preferences.
Marketing Automation
Create sophisticated automated campaigns for email and SMS combined.
Digital Communication
The comprehensive solution to manage and automate your digital communication across email, SMS, websites and landing pages.
Email marketing healthcheck
We are confident that we can help you, which is why we offer a free healthcheck to identify potential issues with your current programme and free advice on things that could be done to improve it.