Help articles
CATEGORY: Forms and Landing Pages
Full setup: Website popups
In this help document, we will run through the process of creating a pop-up form which can be placed on your website. A couple of use cases for pop-ups are notification messages or pop-up forms.
*Please note depending on the pop-up you wish to use, you may need an active sign-up form and landing page. You can find the details on how to set these up below and we will touch on this more throughout.
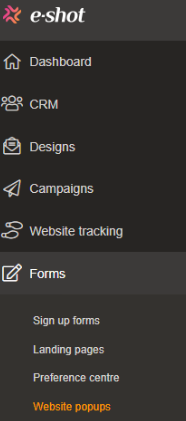
How to find website popups
Website popups can be located in e-shot, under the ‘Forms’ section in the navigation bar on the left as seen below.
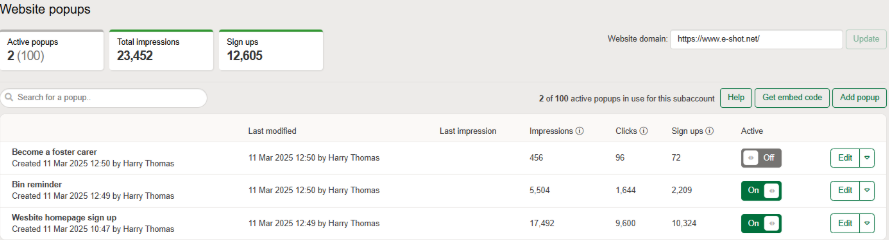
Popups list page
Below you can see what the popups list page looks like.
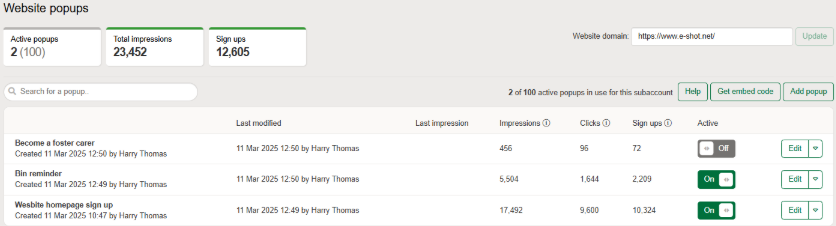
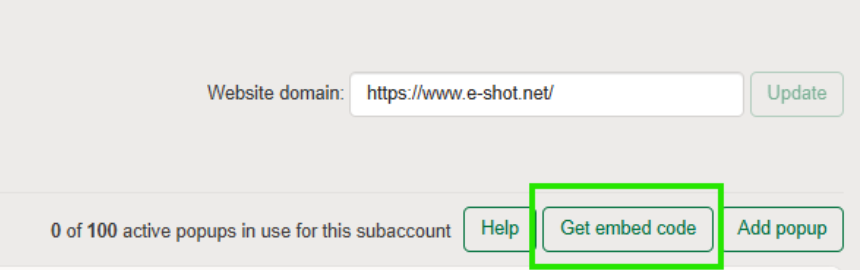
In the top left you can find how many active popups you have out of 100. You will also find how many total impressions all your popups have had. If you have any sign-up forms attached to your popups, you can how many subscribers it has helped you gather.
In the top right you can find and edit the website domain that will be used for your popups. Only one domain can be used per subaccount. This is something that can only be set by us the e-shot team but its worth noting.
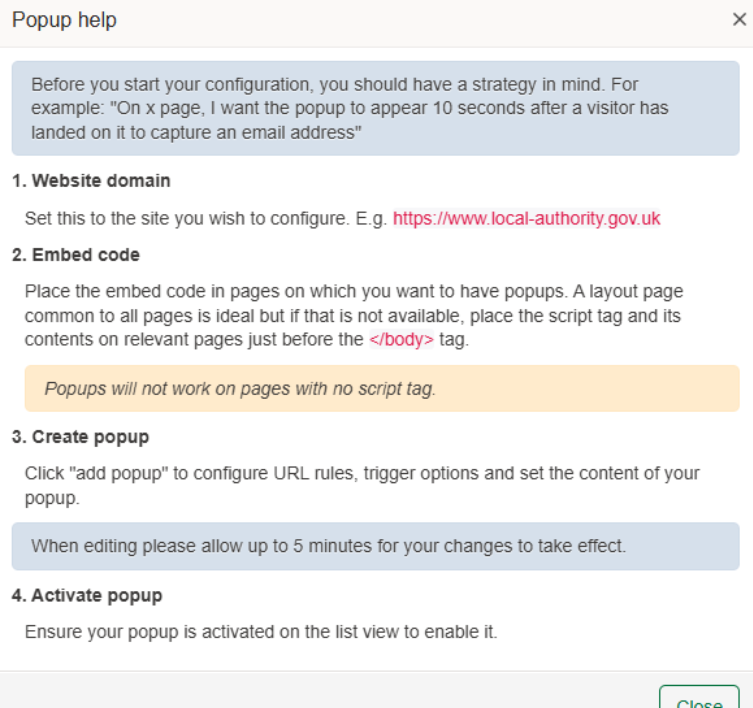
Just below this you have the ‘Help’ button. Which provides you with some brief help to on how to setup popups as seen below.
Just to the right of that, you have the ‘Get embed code’ button. This will provide you with the code snippet that needs to be added to your websites code in order for the popups to actually work.
And of course, if you have any popups already, they will be shown in a list view where you can see the granular details for each one. You have the ability to make them active, edit, clone or delete just like the landing pages page.

Finally, we have the ‘Add popup’ button. This will take you to the page to begin creating your popup.
Creating your popup
To begin, click the ‘Add popup’ button. You will be taken to the below setup page.
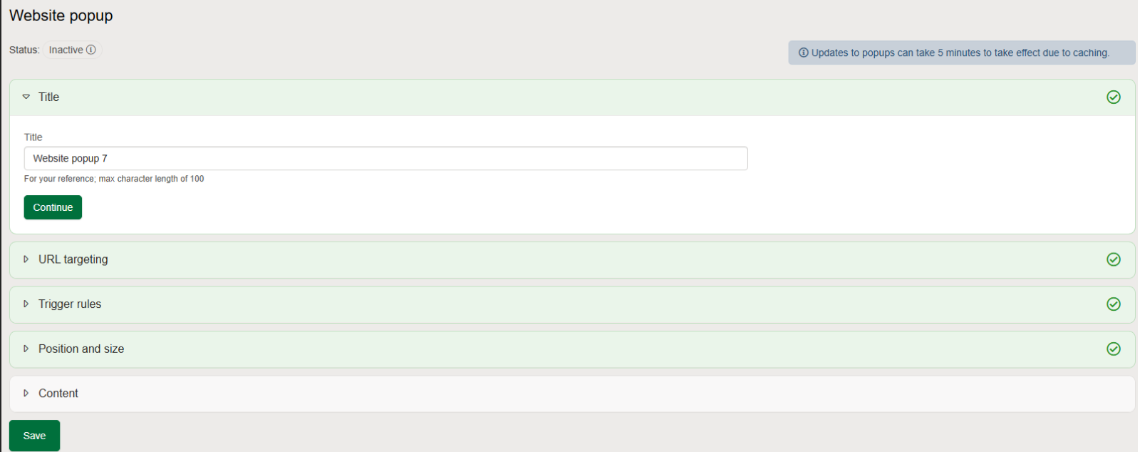
The layout and split of each section here are just like the existing forms pages within e-shot where you can open each dropdown or click the continue button to move onto the next section.
Title
This is just the name of your popup and will only be seen by e-shot users in the list page we looked at earlier.
URL targeting
Here you set the URL targeting for where your popup will appear, as seen below there are a few different options to choose from.
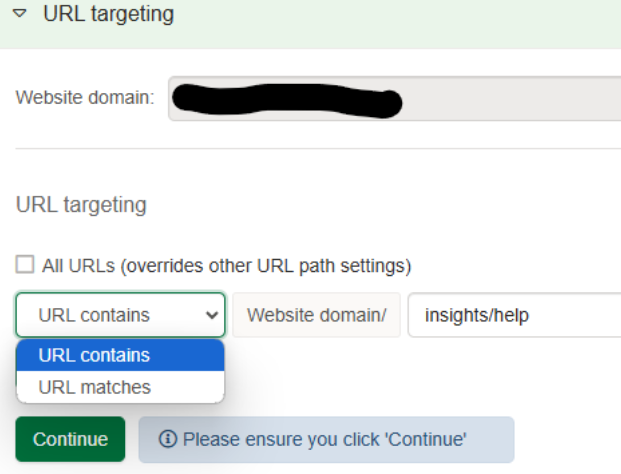
All URLs tick box: The popup will show on ALL pages of your website that match the website domain chosen.
URL contains: The popup will show on just URLs that contains certain text. In my above example see I have entered it contains ‘insights/help’, meaning the popup would appear on all our help article pages.
URL matches: The popup will show on the ONLY the exact URL entered. In my above example, this means it would only show on the help articles homepage and not all help article pages.
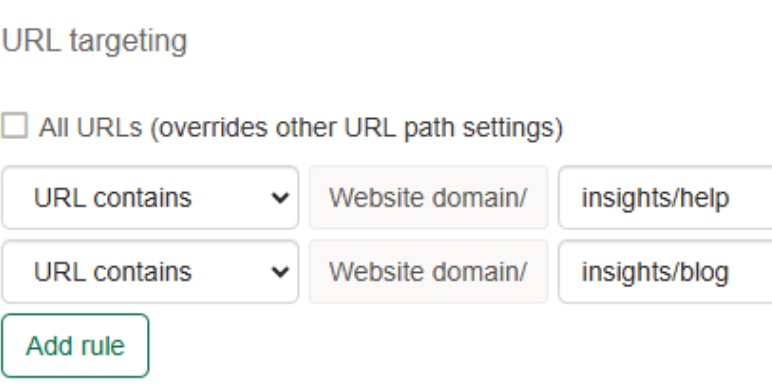
*Note, you can add more than one rule if not using ‘All URLs’ tick box. To do so simply click the ‘Add rule’ button. As seen below I am now choosing for my popup to show on all help and all blog pages.
Trigger rules
Here set the rules for when you popup triggers, in other words, when it actually popups on the URLs chosen on the step before.
As seen below, there are a few options you can set to determine this.
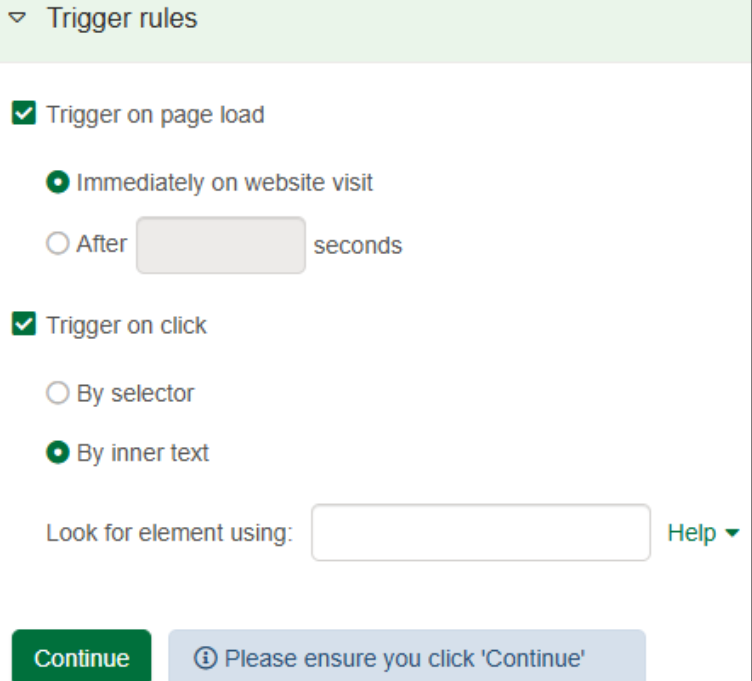
Trigger on page load
Immediately on website visit: The popup will appear as soon as the page URL is visited.
After X seconds: The popup will appear after visiting the URL specified and after the number of seconds you specify.
Trigger on click
You can control which elements (like buttons, links, or images) trigger your pop-up by specifying either a CSS selector or inner text. Here's how each method works:
Target by CSS Selector (Recommended for Precision): Using a CSS class or ID is a reliable way to target specific elements on your site.
To target a class: Enter .my-class to select all elements with the class my-class.
To target an ID: Enter #myID to select the element with the ID “myID”.
Example:
If your button's HTML looks like this:
<button class="subscribe-button">Subscribe Now</button>
➡️ Enter .subscribe-button as your selector to target this button.
Target by Inner Text (Great for Simplicity): If your button or link doesn't have a clear class or ID, you can target it based on its text. Simply enter a short text string that matches part of the button’s visible text.
Example:
If your button's HTML looks like this:
<button>Get Started</button>
➡️ Enter "Get Started" as your target text.
Tip: Use concise and unique text to improve accuracy. Avoid using very common phrases like "Click Here" unless it's distinct on your page.
*Please note, here you can again choose to add a trigger rule on both page load and click. This is handy for example if you wanted a sign-up form to popup after 10 seconds but also on clicking the ‘Subscribe’ button in your website's footer.
Position and size
Here you can choose where your popup will show on the screen as well as the width and height of the popup.
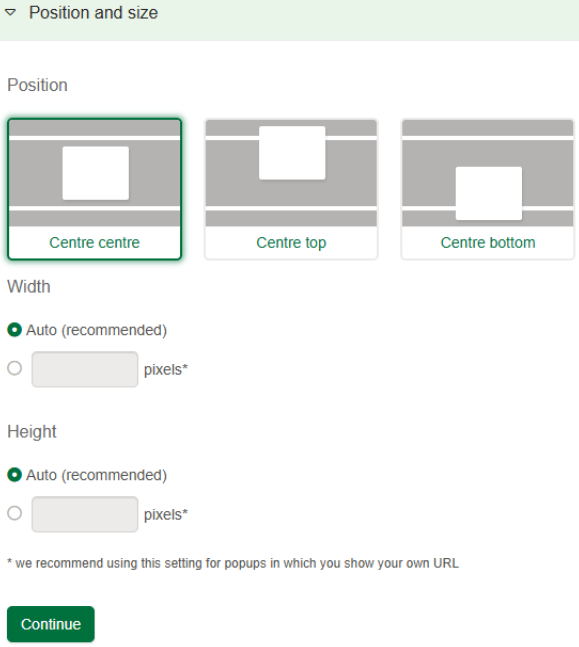
The options here are self-explanatory but please note that width and height is set to ‘Auto’. We strongly advise you do not set these yourself as ‘Auto’ will best suit each screen size.
Content
Here you can choose and edit what your popup contains. Such as is it a sign-up form or just a notification message.
Show URL in popup: Here you can specify a page URL which is shown in the popup. You can of course place any URLs in here, but we recommend using this method if you wish to use the popups as sign-up forms. This means you can simply attach your e-shot sign-up form to an e-shot landing page and paste the landing page URL in here.
Choose popup template: Here you can choose from a selection of pre-defined templates as seen below.
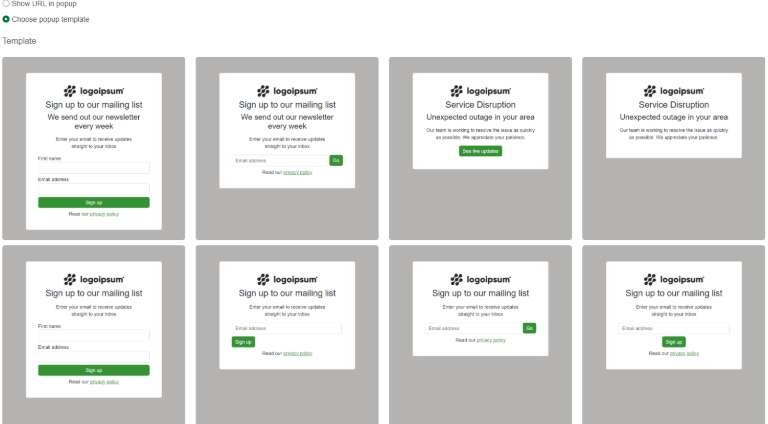
Hovering a template will allow you to preview it or choose it as your template.
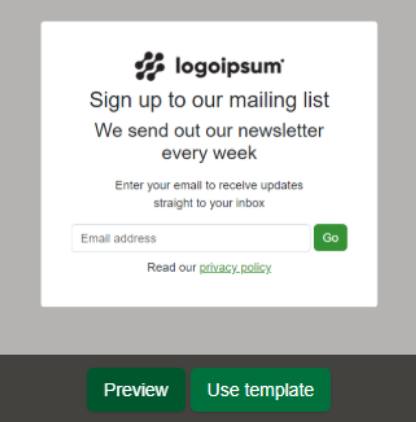
Preview: Pops up on your screen as seen below. Gives you a better understanding as to what the popup would look like.
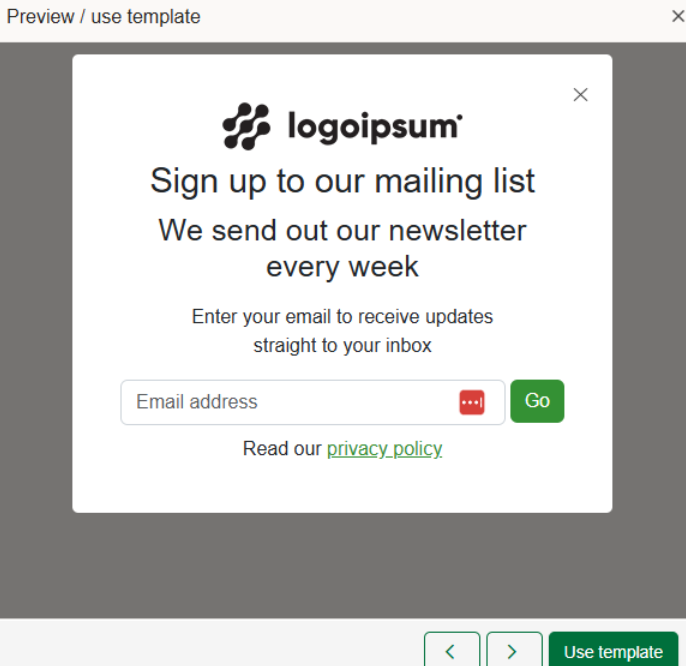
Use the arrows to navigate through the templates or click the ‘Use template’ button to confirm your choice.
Once you have confirmed your template choice, you will be taken to the below page where you can edit the template.
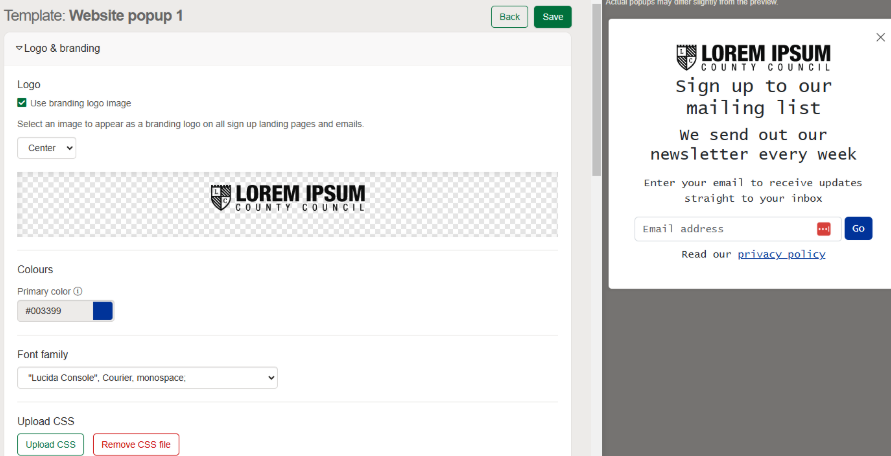
Logo & branding: This section allows to customise the logo used and branding elements such as the font as well as the colour used for the button and privacy link. See below an amended example with a new logo, font and colour.
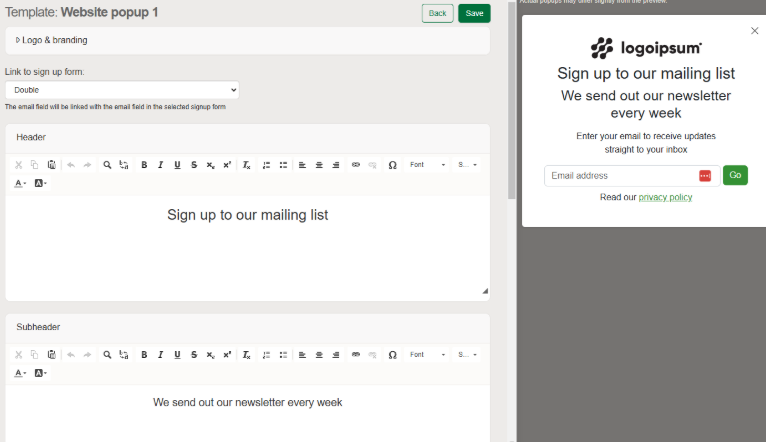
Link to a sign-up form: Here you can choose which sign up form is linked to your popup. This is an important step if your popup is being used for gaining new subscribers.
The form chosen here will determine where the subscribed contact will go after signing up. For example, if on your form you have Preference A and B. After confirming the sign up, the contact will go into those preferences.
Please note choosing a form will not pull across the heading text and branding used on the form. This is purely for the contact allocation. If you are using popups for gaining new subscribers, we recommend just using a landing page link like we covered above.
Headings and body text: Depending on the template chosen, you may have more text available for you to edit. My chosen template here has a heading, sub heading and body text.
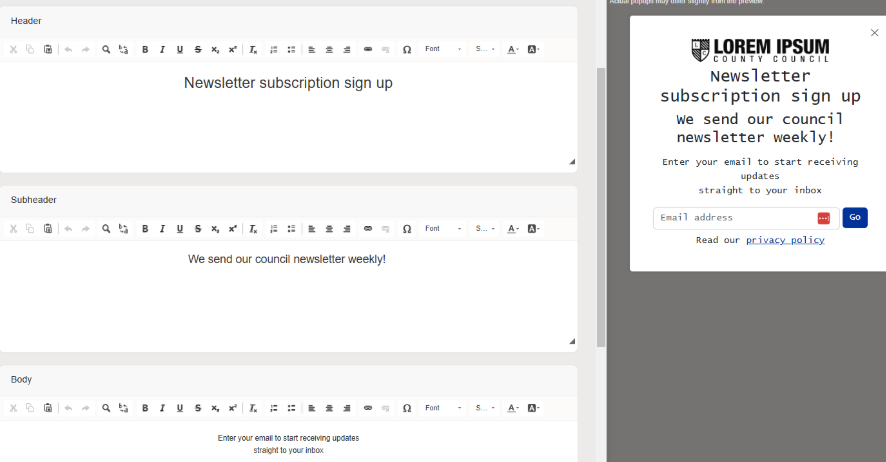
Button text: Update the text inside the button of your pop up. This is what someone has to click to confirm the action. Again, not all templates have a button, this depends on your selection.
Footer text: By default, most templates have the privacy policy link text here. We recommend keeping it this way, just make sure you add the correct link.
IMPORTANT: As you make changes to each section, please ensure to click the ‘Save’ button at the top or bottom of the page. After doing so your preview on the right-hand side will update.
Now you have set your popups rules and specific either a URL or amended your template. Your popup is now ready to be placed onto the website.
Adding the embed code into your website
For the popups to actually popup on your website, there is one final step you need to do. Depending on your role, you may need to pass this part onto another team who look after your website.
An e-shot embed code needs to be placed into the code of your website for the pages you are using the popups on.
The code you need can be found by clicking the ‘Get embed code’ button up in the right corner of the popups list page.
Upon clicking you will see the code snippet in red. A button to copy the code is provided.

You or your website team will need to place this code snippet on the relevant pages just before the </body> tag on each website page you wish to use popups on.
The pop-up script embed code always remains the same for each subaccount, so once this is done, is does not need to be done again unless you decide to use pop ups on more website pages in the future.
To display your pop-ups on your website, you'll need to add a custom code snippet. Simply copy the provided JavaScript code and paste it just before the closing </body> tag on the pages where you want the pop-ups to appear.
If your site uses a layout page or template that applies to multiple pages, you can add the code there to ensure it appears across your site.
Popular website CMS like WordPress, LocalGov Drupal may have a section such as “Code Snippets”, “Scripts” or an option like "Custom Code", paste the snippet in there.
Once added, your pop-ups will be ready to go!
Managing your popups
From the popups list page seen below you can both view your popups stats and manage your popups.
Turning on/off a popup: A website popup can be switched on/off using the toggle under the ‘Active’ heading.
Please note if the popup script has been installed onto your website that all popups marked as active will begin popping up on your website pages.
A pop up can be disabled at any time, doing so will stop it from showing on the website until it is re-enabled.
Cloning or deleting a popup: Clicking the dropdown arrow next to a popup will provide you the option to clone or delete the popup.
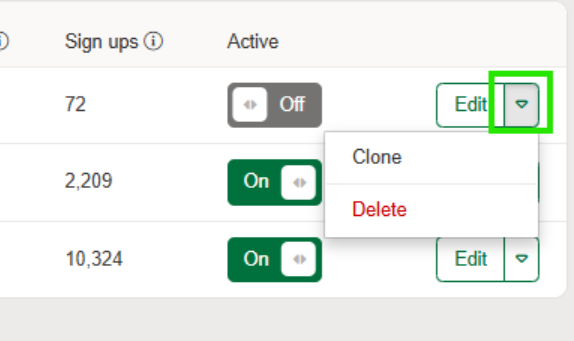
Cloning is handy for when you want a similar looking popup or know you are using the same popup rules. It allows you to edit what you had without playing with the live variant.
Deleting will get rid of the popup entirely. This is not retrievable once done.
Editing a popup: A popup can be edited at any time by clicking the ‘Edit’ button. This will allow you edit the popup rules and design. Please note for live popups all changes saved will be reflected on the popup that shows on the website.
Conclusion
That's our full walkthrough on how to setup website popups within e-shot. If you need any assistance in setting these up, please contact our Customer Success Team via the live chat when logged in.
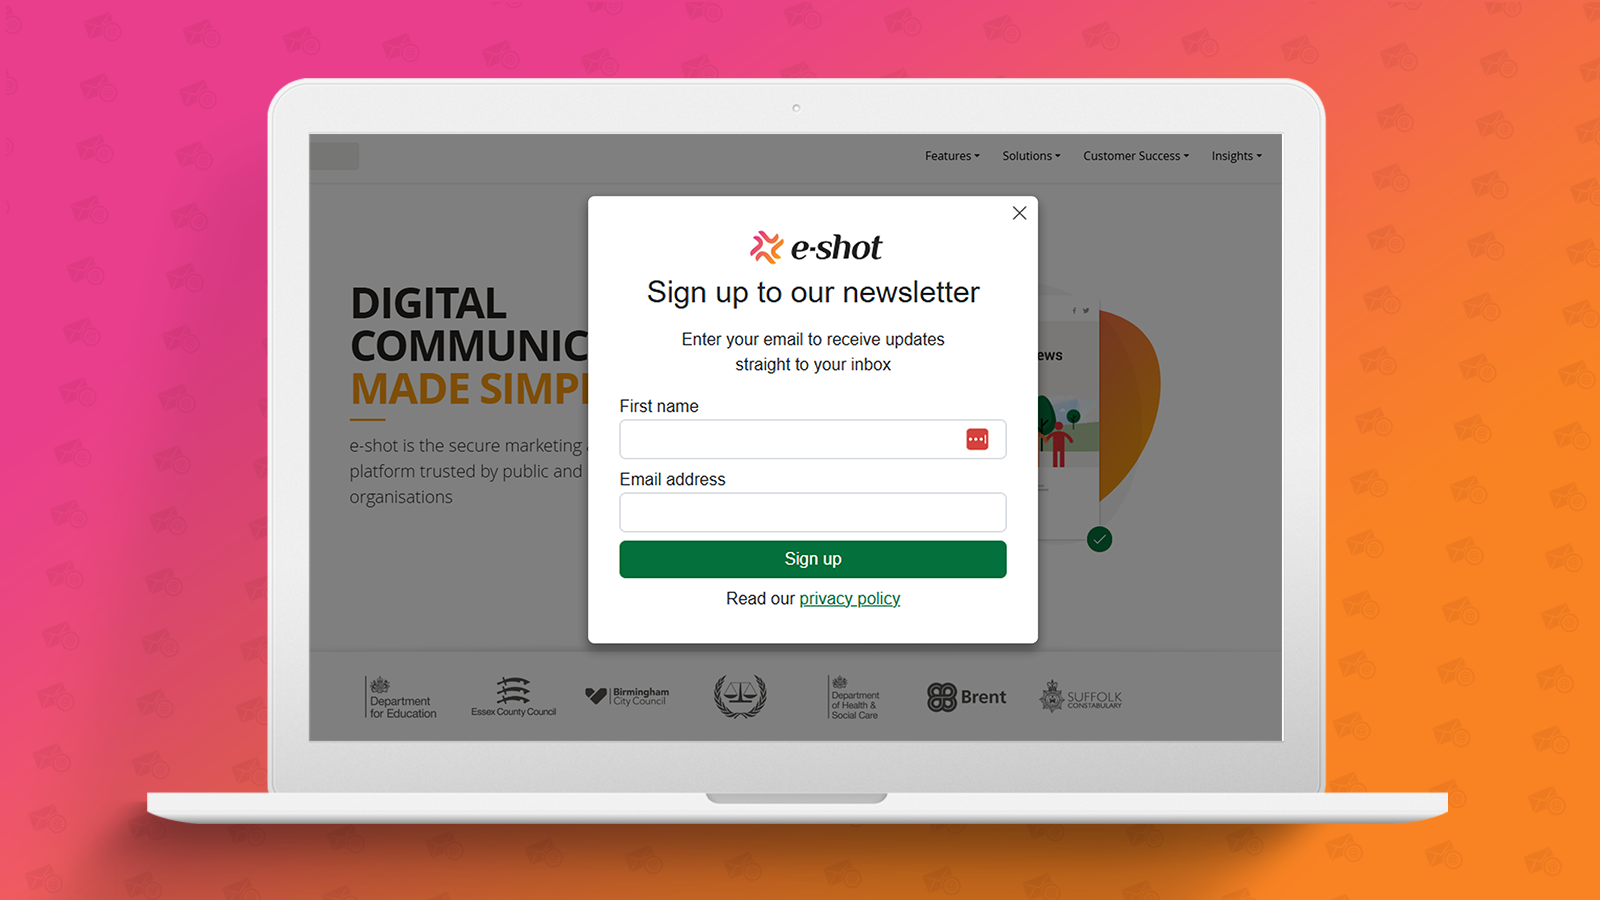
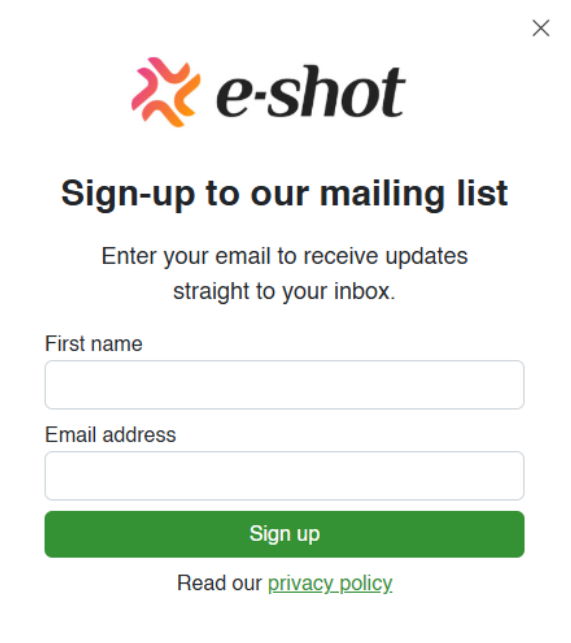
Below you can see a finished product of a popup we created promoting website visitors to sign up to our mailing list.
Solutions
Email Marketing
Create email campaigns and newsletters and manage end-to-end subscription processes with forms and preferences.
Marketing Automation
Create sophisticated automated campaigns for email and SMS combined.
Digital Communication
The comprehensive solution to manage and automate your digital communication across email, SMS, websites and landing pages.
Email marketing healthcheck
We are confident that we can help you, which is why we offer a free healthcheck to identify potential issues with your current programme and free advice on things that could be done to improve it.