Help articles
CATEGORY: Designs
Designs: HTML Upload
As part of the latest e-shot release, we have updated the HTML upload editor design process. This help article will talk you through the new and simplified HTML upload process.
Creating a new HTML upload design
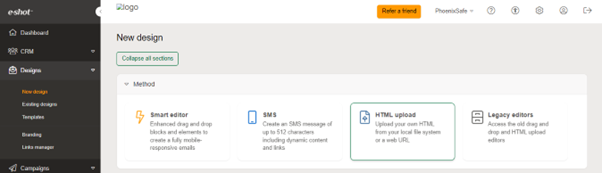
To begin go to the Designs tab and select New design from the dropdown. Once we are on this page, e-shot automatically selects our newest email editor the Smart editor. As we wish to use HTML upload, just click on that editor instead.
Once you’ve selected the HTML upload method, you can continue with setting up the details for your email design. Start by setting the name of your design and assign any tags you may want.
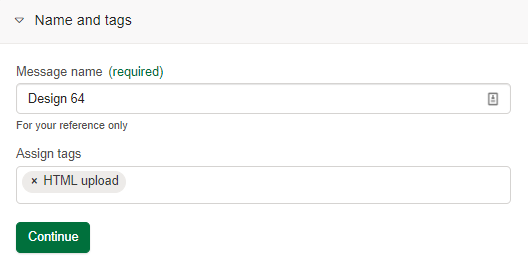
These two are only visible to you and other users of the account, the message name is simply the name of the design, and the tags are something the user can set as a method of filtering your designs in the Existing designs page.
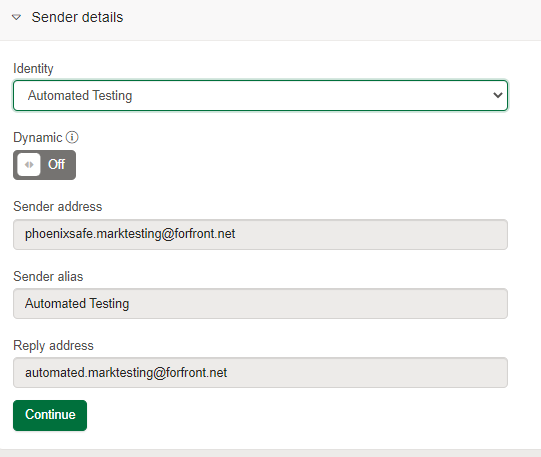
Next is the Sender details, here is where you set up what the email will appear like in the subscriber’s inbox. This will automatically be set to your account default identity, if one has been set. This can be overruled in this section using the dropdown.
The sender address is the email that the message will be received from, the sender alias is the name that will appear in the inbox and the reply address is the email that replies to your email message will go to.
You can also turn on the dynamic switch for the sender details. When switched on you can map different fields to the sender alias and reply address, so they are dynamic depending on what the field is for each separate contact.
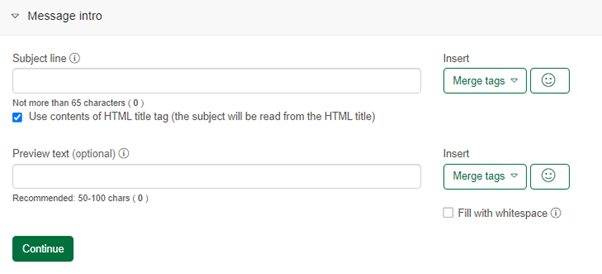
Once your sender details have been filled then you move onto the Message intro. This is where you can set the Subject line and Preview text for the design. These two factors are very important for when sending an email campaign, if you need help with subject lines, you can find out more in our dedicated article.
You can also tick the ‘Infer subject line from HTML title tag’ this will take the name of the file you choose to upload and set the subject line to the whatever the HTML title tag is set, don’t worry this isn’t something that’s needed. The subject line can be changed up until your campaign is queued to send. Preview text is optional, however we always recommend you set something that’s relevant to the subject line to help increase your open rates.
Uploading your HTML
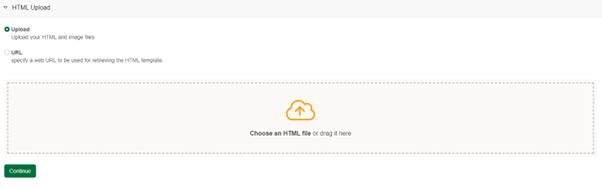
Once we have selected all these details, we get the step where you can upload your HTML file. Here, you are given two options, Upload and URL. The upload option is where you upload the entire HTML file you have including any images in this file so that e-shot can easily find them. The URL option is simply just providing the public URL to the HTML you wish to upload.
If you select the upload option, to add your HTML, you can either click on 'Choose an HTML/ZIP file' which is in bold, this will take you to your files where you can choose what to upload. Alternatively, you can drag and drop the file into the dedicated area.
If you choose the URL option, you can simply just paste the URL into the box provided.
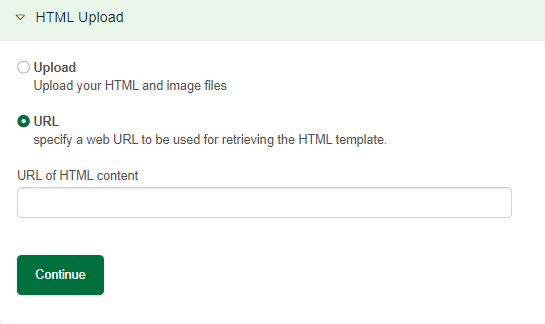
Once you have attached your HTML file or URL, click the 'Continue' button to upload it and continue.
After clicking continue, you will see the files and images that have been found within the uploaded HTML. You will be able to see the file name as well as its status (Uploaded or Missing).
If a file is marked as 'Uploaded' this means it was found, if you wish to edit an uploaded file, you can do so by clicking the 'Edit' button. This will bring up your files, to choose what you want to replace that file with.

If a file is marked as 'Missing' this means the file was not found. To manually upload this file, you can click the 'Add a file' button to select the desired file. Once you have added a file, that particular file will move from 'Missing' to 'Uploaded'.
At any moment you can use the 'Preview' button to preview what your email will currently look like with the files that have been uploaded. Although this is optional, we always recommend you preview and test your designs before it is used in a live campaign.
Final steps
Once you have completed all these steps and are happy with how your HTML looks, your HTML upload email design is ready to send and can be viewed in the Existing designs section of your account. You can go back in and make changes to both your designs files and any other details such as the Subject line.
Changes can be made by clicking on the 'Actions' dropdown button next to your design and clicking on edit details.
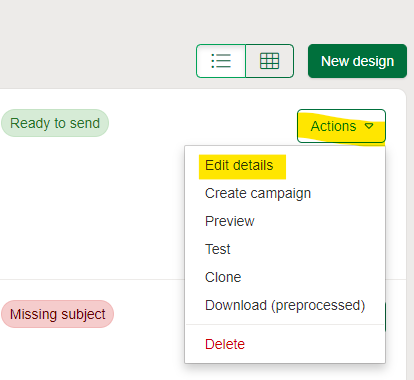
From the actions dropdown you are also easily able to preview your design as well as begin creating a campaign using that particular design.
You may also like these articles

Designs
HTML for Email guidelines
July 23rd, 2020 - Sadie Burgess
There are a few HTML ground rules, that need to be followed. This should be considered for: HTML you upload into the HTML Upload and Dynamic HTML...
.jpg)
email-marketing Best practice Resources
Email pre-flight checklist
March 12th, 2020 - Sadie Burgess
We all know the feeling, that moment just before you hit send - but all that could be set to change. With out pre-flight checklist you can be...
How powerful is your subject line?
How powerful is your subject line?
July 1st, 2022 - Sadie Burgess
Before we get started, lets take a moment to put your email in context:An estimated 306.4 billion emails were sent and received per day in 2020....
Solutions
Email Marketing
Create email campaigns and newsletters and manage end-to-end subscription processes with forms and preferences.
Marketing Automation
Create sophisticated automated campaigns for email and SMS combined.
Digital Communication
The comprehensive solution to manage and automate your digital communication across email, SMS, websites and landing pages.
Email marketing healthcheck
We are confident that we can help you, which is why we offer a free healthcheck to identify potential issues with your current programme and free advice on things that could be done to improve it.