Help articles
CATEGORY: CRM
CRM - Contact View
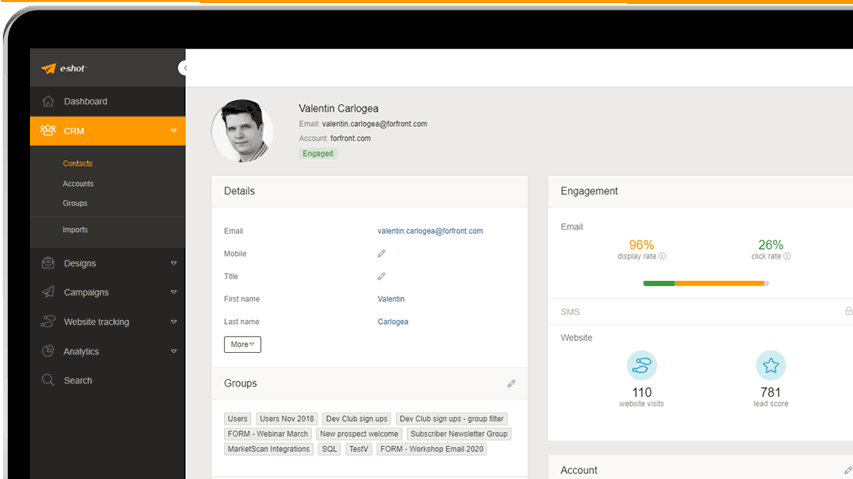
Contacts View
From various areas around e-shot, in particular the CRM > Contacts page or whilst inside of a group or preference, clicking on any of the main contact field values against an individual contact will open the Contacts View page.
This page displays all that individuals contact details alongside a summary of their activity. As shown below.
Contact Record Overview
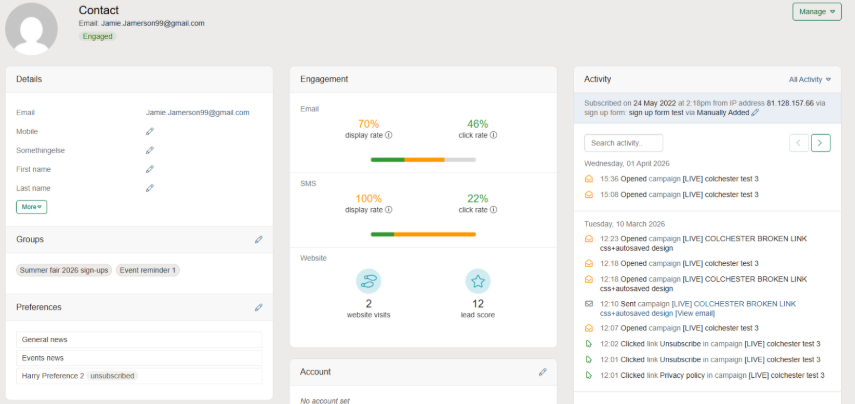
Details
The Details panel displays the contact’s information. By default, only essential fields are shown.
Click More to expand and view all standard and custom fields.
To update a field:
Click into the field
Edit the value
Click outside the field to save automatically
Groups
The Groups panel shows all groups the contact belongs to. A contact can be part of multiple groups.
To edit group membership:
Click the pencil icon to open the Assign Groups modal
Remove a group by clicking the ✕ next to its name
Add groups by:
Clicking into the field to open the dropdown
Scrolling or typing to search
Selecting the desired group(s)
Preferences
The Preferences section displays the contact’s selected preferences.
To update preferences:
Click the pencil icon to open the Assign Preferences modal
Remove a preference using the ✕ icon
Add preferences via the dropdown list
*Explainer: Groups are defined as lists you as the e-shot users manage for example, the contact may have signed up to a particular event. Preferences should only be managed by the contact themselves. An example of a preference would be your various newsletters such as events or monthly news.
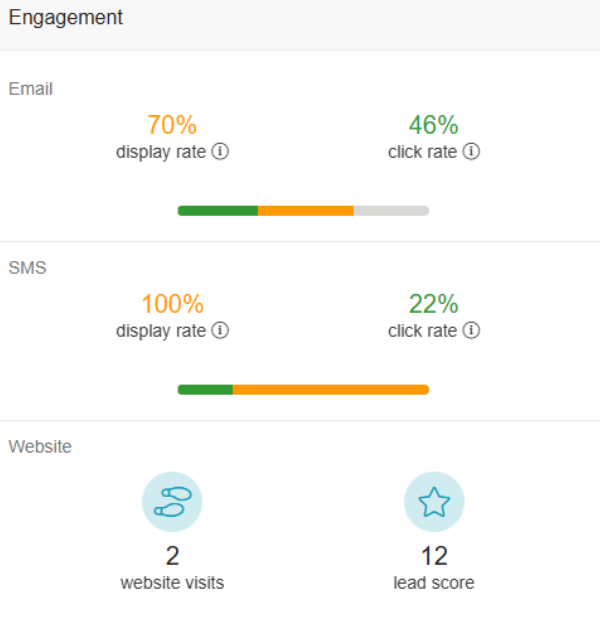
Engagement
The Engagement section provides both visual and numeric insights into the contact’s interactions, including:
Email engagement
SMS activity
Website visits (if Website Tracking is enabled for your e-shot account)
Lead score (if Website Tracking is enabled for your e-shot account)
For each of these areas you can see the overall display and click-through-rate (CTR) for that individual contact.
See below, we can see this contact has an average 70% email display rate with a 46% CTR and for SMS they have a 100% open rate with a 22% CTR.
Account
The Account section shows which account the contact is associated with. Note the accounts feature isn't available for all e-shot accounts just like the website visits.
To update the account:
Click the pencil icon
Select a new account or choose the blank option to remove it
Click Save
You can scroll through the list or type to filter and find a specific account.
Activity
The Activity section displays a chronological log of the contact’s interactions, including date and time.
Features include:
Search bar to filter activity
Dropdown to filter by activity type
Subscription date and contact source (editable via pencil icon)
The activity section can be useful to see exactly when a contact was sent certain campaigns, if they opened or clicked them and any other interactions they made with your comms.
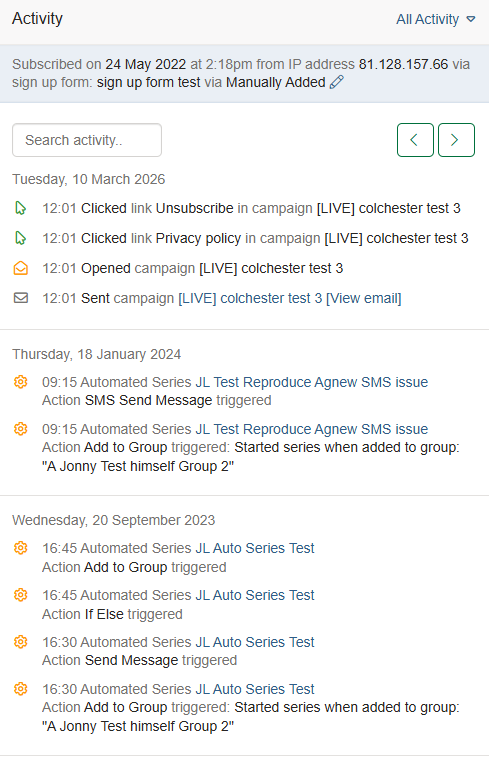
Automated Series Tracking
Within the Activity panel, you can track a contact’s progress through automated series:
View the date, time, series name, and step name
Access the email sent via a direct link
Click the series name to open the full automation flow
From there, you can:
View the entire series
Access an audit log of the contact’s journey through the series
Manage Button

The Manage button (top-right corner) provides additional actions:
Export Contact
Exports the current contact as a CSV file
Delete
Permanently deletes the contact in that subaccount
This action cannot be undone
Unsubscribe
Unsubscribes the contact from the selected subaccount
This action cannot be undone
Unsubscribe from All Subaccounts
Unsubscribes the contact from ALL subaccounts
This action cannot be undone
Available to admin users only
Make test contacts
Adds this contact to the Test group within e-shot
Makes the email available as an address to send test sends to from e-shot
You may also like these articles

Best practice
Maintaining your email marketing database
February 22nd, 2019 - Dan Hare
Your email marketing database is like a plant. It needs to be continually fed, watered and pruned if it is to stay in good health, yet...
CRM
CRM - Engagement Categories
October 30th, 2019 - Harry Thomas
With e-shot you can keep a close eye on the health of your contact data simply and efficiently. Using the CRM dashboard, you are able to see at a...

CRM FAQs
CRM - Importing Contacts
November 6th, 2019 - Sadie Burgess
Importing contacts is a quick and easy way to add a larger list of contacts into e-shot. Contacts can either be imported via the API or manually...
Solutions
Email Marketing
Create email campaigns and newsletters and manage end-to-end subscription processes with forms and preferences.
Marketing Automation
Create sophisticated automated campaigns for email and SMS combined.
Digital Communication
The comprehensive solution to manage and automate your digital communication across email, SMS, websites and landing pages.
Email marketing healthcheck
We are confident that we can help you, which is why we offer a free healthcheck to identify potential issues with your current programme and free advice on things that could be done to improve it.