Help articles
CATEGORY: CRM
CRM - Accounts View

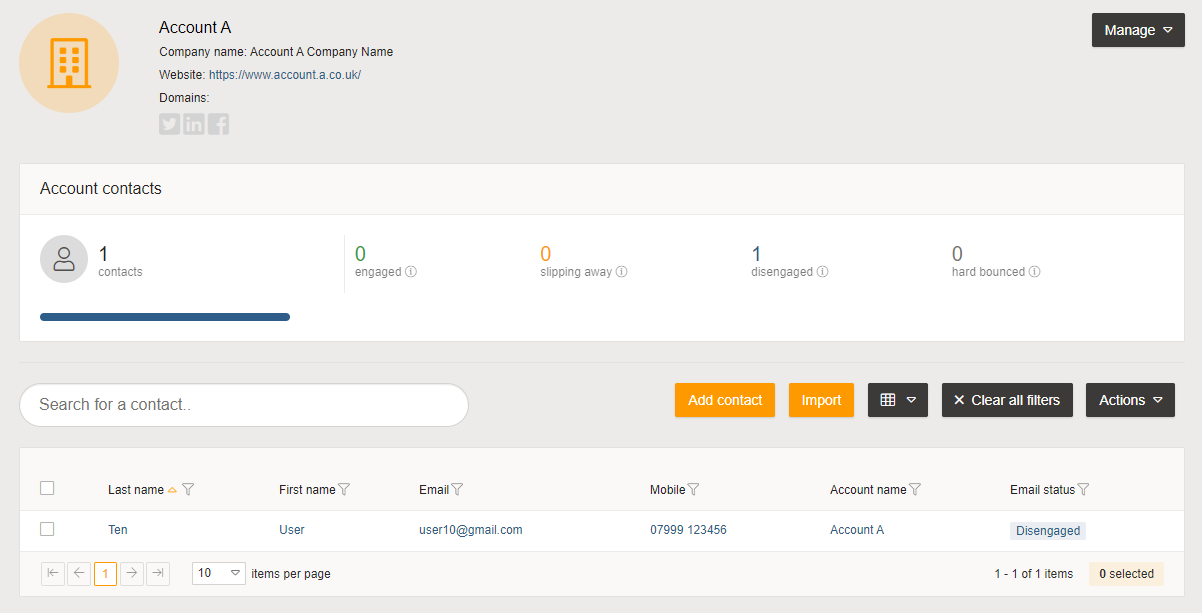
Accounts View
The accounts view page shows a summary of the account information at the top of the page, along with a breakdown of which categories each of the associated contacts belong to. Any domains an account is associated with will be displayed and clicking on any of the social media icons or website link will open the appropriate page. Beneath that is a search box, contact grid and available options you might be familiar with from similar pages.
Manage button
The Manage button in the top right of the page contains a number of options applicable to the account in general, allowing you to edit the information, delete the account or remove all the contacts from it.
Edit
This option opens the Edit Account modal which shows the same options as the Add Account modal used when adding an account manually.
Delete
As with the delete option from the Accounts List page, this provides two options; the account and all associated contacts can be deleted in their entirety, or the account can be deleted but all the contacts remain intact, just unassociated from the selected account(s).
Remove all contacts
This allows you to unassociate all contacts from the account, they won't be deleted, just their association removed after confirming you would like to proceed.
Contact grid
Each of the contacts within the account are listed in the contact grid, displayed in the same manner as other pages that display the same information.
Add contact
Clicking this button will open the Add Contact modal and on completion will automatically associate the contact with the viewed account.
Import
The Import button will navigate to the contact import wizard.
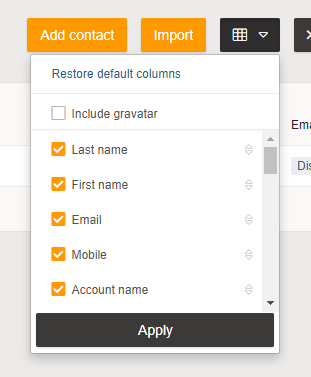
Custom columns
To change the columns you would like to display simply click the Field Selection button, tick the columns you would like to show, untick the ones you would like not to, drag them into the preferred order and click Apply. The default columns and order can be applied by clicking the Restore option from the dropdown.
Filters
Each of the contact columns can be filtered, which is accessible by clicking the symbol in the column header, then simply select your operator and value then click Filter to update the contact grid results. The email status has an additional layer of filtering that can be used to show all hard bounced contacts but exclude unsubscribed, for example. If you would like to reset the filters back to default then just click the Clear all filters button, which will be greyed out if nothing has been applied.
Paging
The contact grid can be customised to show a different number of rows based on your preference. You can choose to show either 10, 20, 50 or 100 rows within the grid, which is saved to your user profile and will persist between pages, so each of the grids on the other CRM pages will show your preferred choice.
Actions button
The Actions button contains a number of options that are similar to that of other pages as they share similar contact grids. To select a contact just tick the checkbox against the right row. Alternatively tick the column header checkbox to select all contacts from all pages in the grid.
Export selected contacts
To export a list of contacts select the ones you would like, then click the Export selected contacts option from the Actions dropdown. You will then be prompted on where you would like to save your CSV file containing the contact information.
Add to groups
Contacts can be assigned to a single or multiple groups in bulk with this option, just select your chosen contact(s), select Add to groups from the Actions button dropdown, select your group(s) and click Save. When selecting a group you can use the dropdown slider, or alternatively you can type directly into the box to refine the search options. If your chosen group isn't shown in the list an option to create a new group will be presented.
Remove from groups
The Remove from groups option allows you to quickly remove any number of contacts from one or multiple groups. Simply select your contact(s), select the group(s) you would like to remove them from and click Remove. All of your selected contacts will then be removed from the groups you have chosen.
Assign to account
Assigning any number of contacts to your chosen Account is easily achieved by selecting your contacts, clicking Assign to account from the Actions button options, selecting a single Account and clicking Assign. If any of your contacts are already associated with an existing account they will be removed from the old Account and added to the new Account. The first 20 Accounts are displayed in the Account selection dropdown but can you enter text to refine the selection.
Unassign from account
After choosing a number of contacts, selecting Unassign from
account from the Actions dropdown and clicking Unassign will remove the
selected contacts from all Accounts.
Delete contacts
This function allows you to delete all of the selected contacts from e-shot once the option has been selected and the deletion confirmation message accepted.
Unsubscribe
Selecting your contacts and choosing Unsubscribe from the Actions dropdown menu will unsubscribe the contacts from the logged in subaccount. This action cannot be undone.
Unsubscribe from all subaccounts
This performs the same action has the Unsubscribe function, but also unsubscribes the contact(s) from all subaccounts within your e-shot account. This action is only available to an Admin user.
Bulk account creation
If you would like to create accounts from your existing contacts based on their domain name, this can be done from the e-shot ultimate tab of the Settings page, which is only accessible to admin users. The process will analyse each of the contacts within your subaccount and for those with a domain that is not an Internet Service Provider, plus is not already associated with an account, then an account will be created using the domain name. An email will be sent to the logged in user's email address once the process is complete.

You may also like these articles
FAQs
Account & Dashboard FAQs
September 24th, 2019 - Sadie Burgess
What is the e-shot dashboard page? The dashboard page is the page you will first land on after logging in to e-shot. It gives a brief overview into...
Solutions
Email Marketing
Create email campaigns and newsletters and manage end-to-end subscription processes with forms and preferences.
Marketing Automation
Create sophisticated automated campaigns for email and SMS combined.
Digital Communication
The comprehensive solution to manage and automate your digital communication across email, SMS, websites and landing pages.
Email marketing healthcheck
We are confident that we can help you, which is why we offer a free healthcheck to identify potential issues with your current programme and free advice on things that could be done to improve it.