Blog
CATEGORY: email-marketingDeliverability
Allowlisting: How it works and why you should encourage it
With the sending of marketing emails on mass being a regular occurrence, and in many cases unsolicited (based on Legitimate Interest in B2B), many email platforms have enhanced their spam filters in rigorous attempts to help keep the likes of the dubious and proverbial Nigerian Prince out of our focused inboxes.
As email recipients, we all welcome these algorithms with the hope that they result in better protection and security in our mailbox.
However, as an email marketer, there is nothing more soul destroying than when these extra vigilant activities work against you and wrongly filter your important communication into the spam folder.
As either an email marketer seeking to safeguard their deliverability or an email recipient who wants to pro-actively keep their favourite emails from being junked, you can help the messages get through by whitelisting the sender’s address.
In this article we will cover the benefits of whitelisting email addresses and domains; we will also give you a step by step guide across the major email clients.
What is an allowlist?
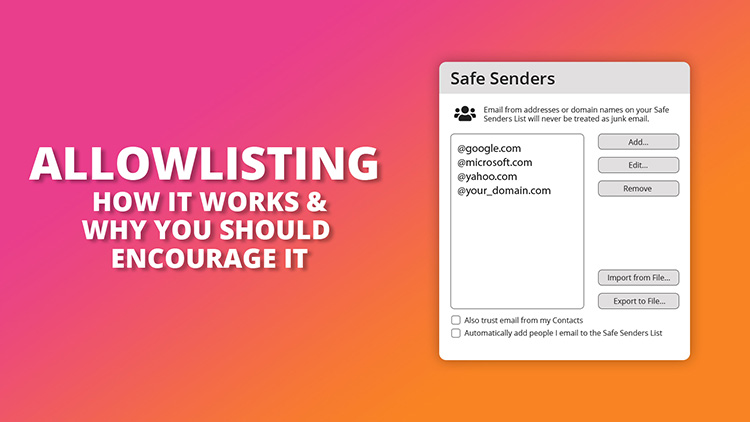
Essentially an allowlist (formerly known as a whitelist) is a collection of email addresses you have given the seal of approval, sort of a VIP pass.
As a recipient, one of the easiest actions you can take to tell your ISP that this email is NOT spam, is by adding the sending email address or domain (the From Address) to a safe sender list. This is used as a ‘seal of approval’ and not only ensure you will receive future messages to your focused mailbox, but also increase the overall reputation of the sender. “Gold dust!”… I hear all the email marketers out there say…
Why should I allowlist the sender's address?
There are many benefits to promoting this ‘seal of approval’ badge and the best time to request it, is at the beginning of your relationship with the recipient; prospect, client, fan or otherwise, during your welcome series or on-boarding sequence. ·
Allowlisting will lead to improved inbox placement and deliverability;
Allowlisting will help to build up a trusted sender reputation;
The visibility and prominence of your emails will increase, as they are being directly sent to a focused inbox rather than being lost in a promotion box or worse, junk folder.
To start, we recommend whitelisting your own sending domain to ensure that test emails or preview emails are guaranteed to get through.
How to allowlist?
Whitelisting is simple to implement either add the from address manually or add it at the point of receiving the message.
Below are whitelisting instructions for some of the major email clients.
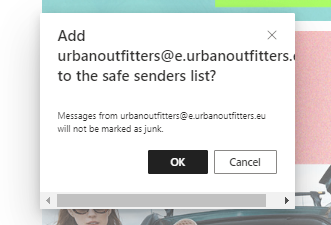
Allowlisting in Outlook.com
Step 1. Click on three dots in the right-hand top corner of the email.
Step 2. Select ‘Add to Safe Senders’
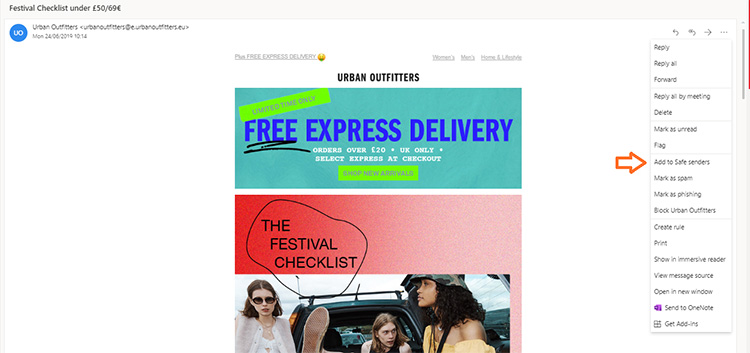
Step 3. A message will pop up, asking you to confirm your decision. Select Ok and messages from this sender will now go into your focused tab.
Allowlisting in Gmail (web)
To ensure future emails from a sender go straight to the ‘Primary’ or ‘Important’ tab instead of the promotions or social tab, it is a simple 2 step process.
Step 1. Drag and drop the email from its current tab to the ‘Primary’ or ‘Important’ tab (or mark as ‘Important’.

Step 2. You will be alerted with a message stating “This conversation has been moved to Primary. Do this for all future messages from xxx@domain.com? Select Yes All messages from this sender will then go straight to your primary inbox tab.
Solutions
Email Marketing
Create email campaigns and newsletters and manage end-to-end subscription processes with forms and preferences.
Marketing Automation
Create sophisticated automated campaigns for email and SMS combined.
Digital Communication
The comprehensive solution to manage and automate your digital communication across email, SMS, websites and landing pages.
Email marketing healthcheck
We are confident that we can help you, which is why we offer a free healthcheck to identify potential issues with your current programme and free advice on things that could be done to improve it.