Help articles
CATEGORY: Help ArticlesCRM
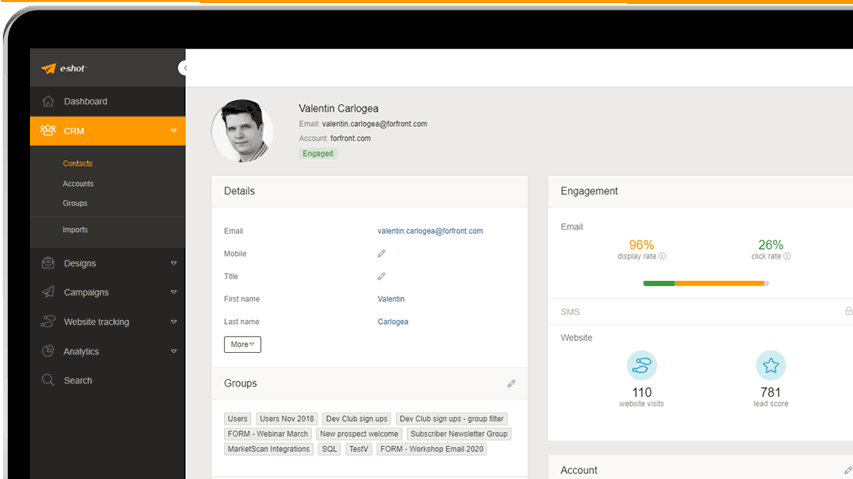
CRM - Contact View
Contacts View
From the Contacts List page clicking on any of the main contact field values will drill down into the Contacts View page, which displays each of the contact values along with a summary of their activity. The contact's avatar will automatically be imported if there's a Gravatar account that shares the same email.

The Details panel displays each of the contact's field values, which defaults to only show the essential information, but clicking More will expand the section and show all of their standard and custom fields. If you would like to update any of the values just click into the field, overtype with what you would like, then click off the field for it to be saved automatically.

Groups
The Groups panel displays each group that the contact is currently a member of. A contact can be associated with many groups. To associate or unassiociate the contact with further groups just click the pencil symbol to open the Assign Groups modal. Any existing groups can be removed by clicking the cross next to the group name and to add additional groups just click within the box to open the dropdown selection. From here groups can be selected by scrolling and clicking, or the list can be filtered by typing the name of the group you are looking for.

Preferences
Any preferences, or preferences and channels if enabled, associated with the contact will be displayed in this section. To edit the current choice you should click the pencil symbol to open the Assign Preferences modal. Preference selection works similarly to groups, existing preferences can be removed by clicking the cross against the name, or clicking into an empty space in the box will open the dropdown menu displaying the choices for selection.

When both preferences and channels are enabled the process
changes slightly. You should choose your preference as before, but then select
one of the channels that are available for that preference and click Add
Preference Mapping to save your choice. The preference/channel mapping will be
added to the box underneath, which can be removed by clicking the cross next to
it if required.

Engagement
The Engagement section shows a graphical and numeric representation of the contact's email and SMS interactions. Their tracked website visits along with their lead score are also displayed for accounts with Website Tracking enabled.

Account
The Account section displays a quick summary of which
account the contact is associated with. Clicking the pencil symbol opens a
modal that allows you to manually amend their account choice from this page if
required by either selecting an account, or selecting the blank option to
remove the selected account, before clicking Save. To locate an account you can
either scroll through the dropdown list, or free type to filter the list.
Activity
The activity section shows a summary of the activity the contact has engaged in with the date and time displayed. If you would like to search for any activity in particular the search box can be used to filter the list. You can also only view a specific type of activity by changing the option in the top right corner. The date the contact subscribed is also listed here at the top, along with the contact's source, which can be amended by clicking on the pencil symbol and selecting an alternative from the modal.


Understanding a contact's progress through an automated series
In the Activity panel you can also see the date, time, automated series name and step name as well as link to view the email sent, to refresh your memory.

If needed you can also access the Automated Series flow by clicking its name from the activity log. Once accessed, you will be able to see the Series plus an Audit of the contact going through it.

Manage Button
In the top right corner of the page there is the Manage button, which contains a number of options, allowing to export delete or unsubscribe the contact.
Export contact
This works in a similar way to the export contacts option from the Contacts List page, but applies only to the viewed contact. Selecting this option will open a download window allowing you to decide where to save the CSV file containing the contact information.
Delete
This option allows you to delete the viewed contact, which returns you to the Contacts List page on completion.
Unsubscribe
Selecting this option will unsubscribe the contact from the chosen subaccount, this action cannot be undone.
Unsubscribe from all subaccounts
Choosing this from the Manage button options will unsubscribe the contact from all subaccounts, which cannot be undone. This action is only available to admin users.
You may also like these articles

Best practice
Maintaining your email marketing database
February 22nd, 2019 - Dan Hare
Your email marketing database is like a plant. It needs to be continually fed, watered and pruned if it is to stay in good health, yet...

email-marketing
Time to spring clean your data?
February 18th, 2018 - Sadie Burgess
Research by Marketing Sherpa shows that a B2B database naturally degrades at a rate of 2.1% per month: that’s 22.5%, almost a quarter of the...

Best practice
Keeping your data clean – farewell freeserve.co.uk
June 7th, 2017 - Sadie Burgess
If you haven’t taken a close look at your data recently, you are not alone. Markets are ever changing places, business’ close or are acquired and...
Solutions
e-shot ultimate
The complete solution to manage and automate your digital communication across email, SMS, websites and landing pages.
e-shot pro
Create sophisticated automated campaigns for email and SMS combined.
e-shot basic
Create email campaigns and newsletters and manage end-to-end subscription processes with forms and preferences.
Email marketing healthcheck
We are confident that we can help you, which is why we offer a free healthcheck to identify potential issues with your current programme and free advice on things that could be done to improve it.